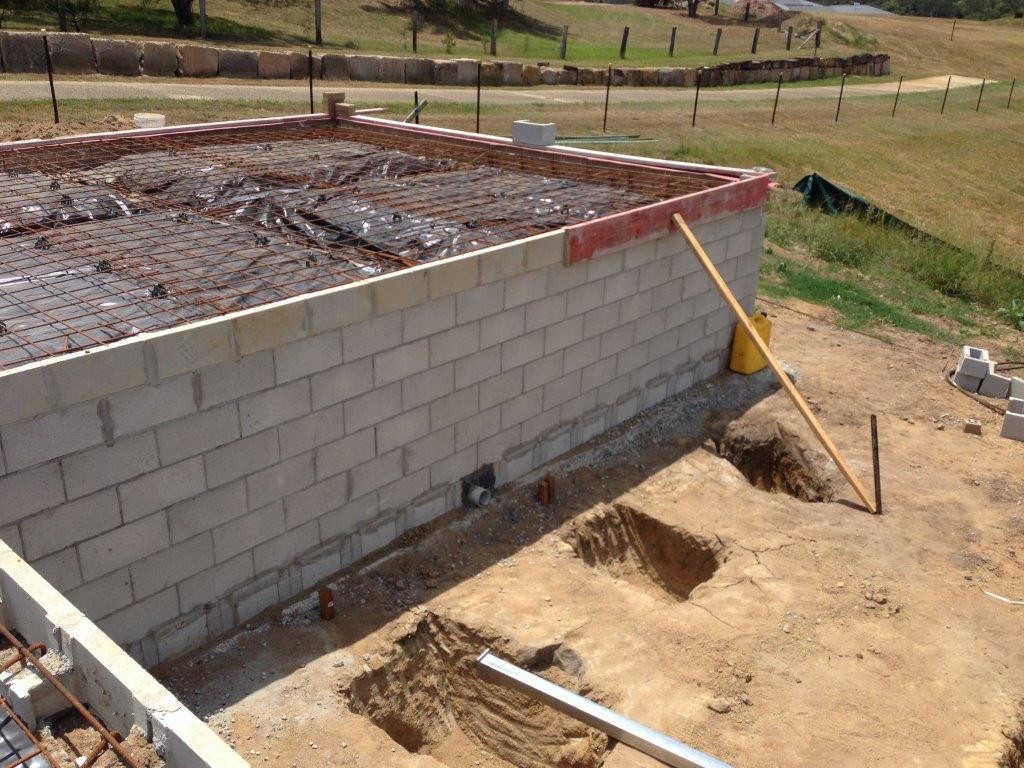
Raised raft slab on sloping site with besser blocks under the slab level
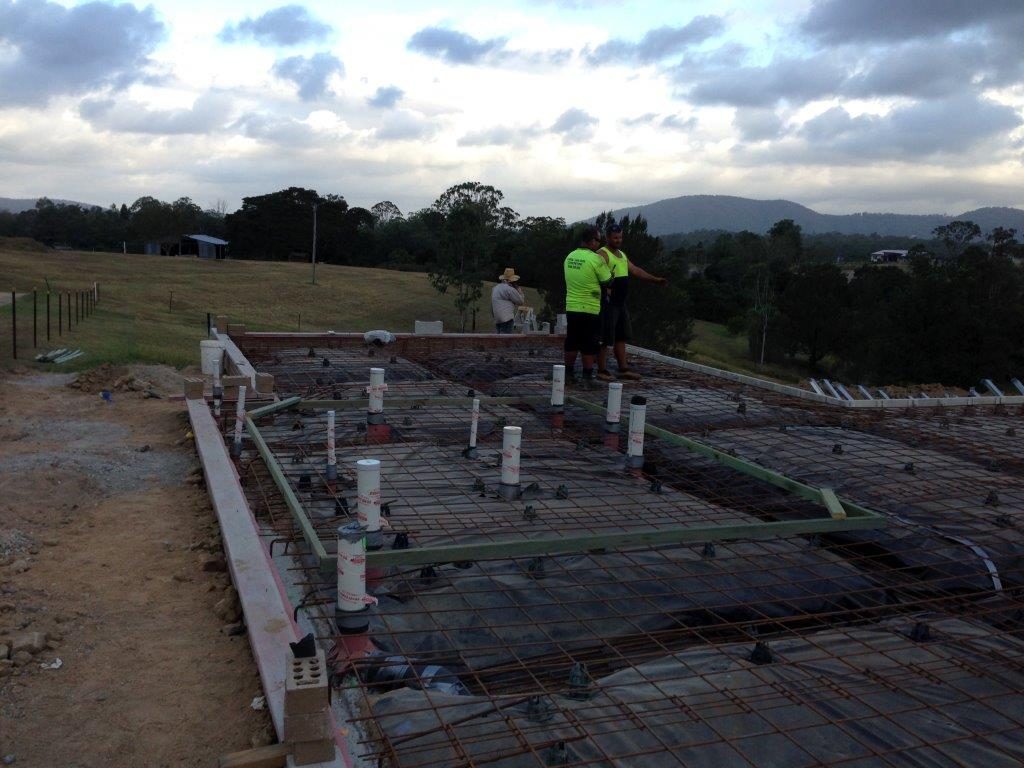
Raft slab being prepared for concrete
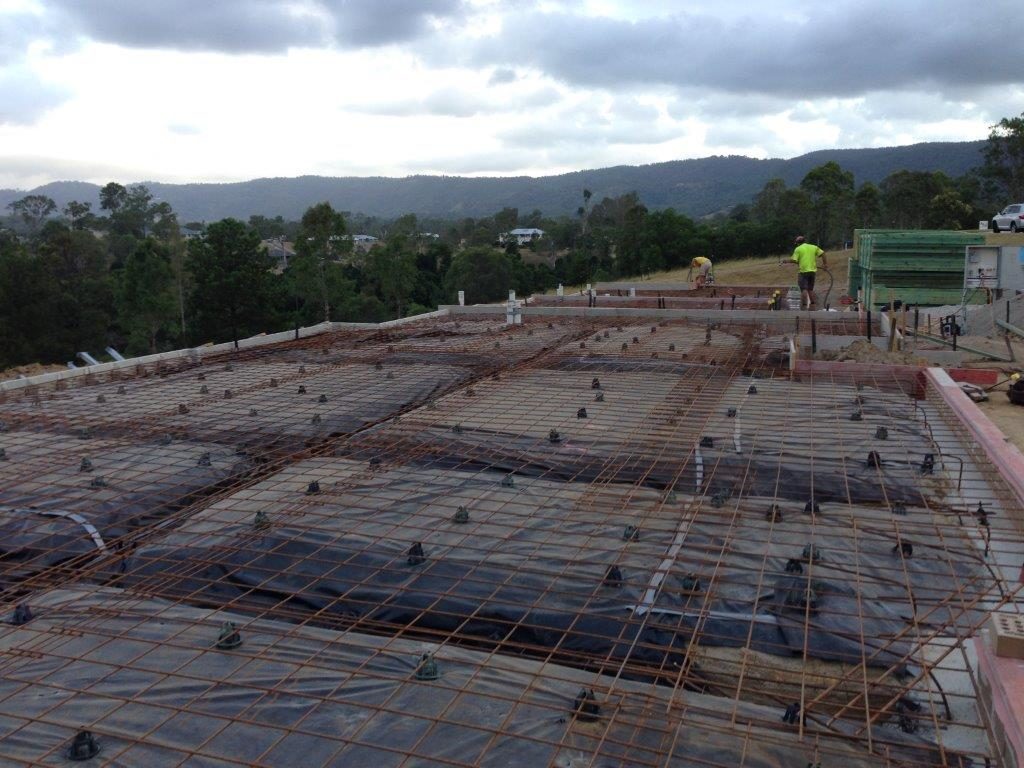
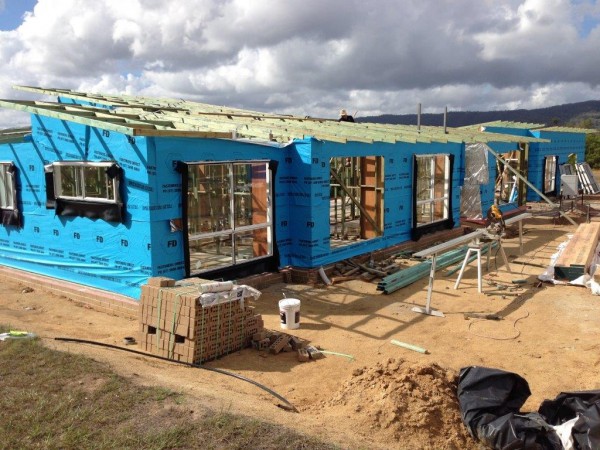
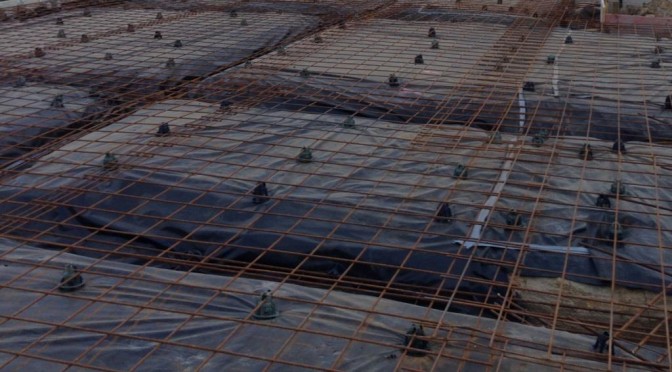
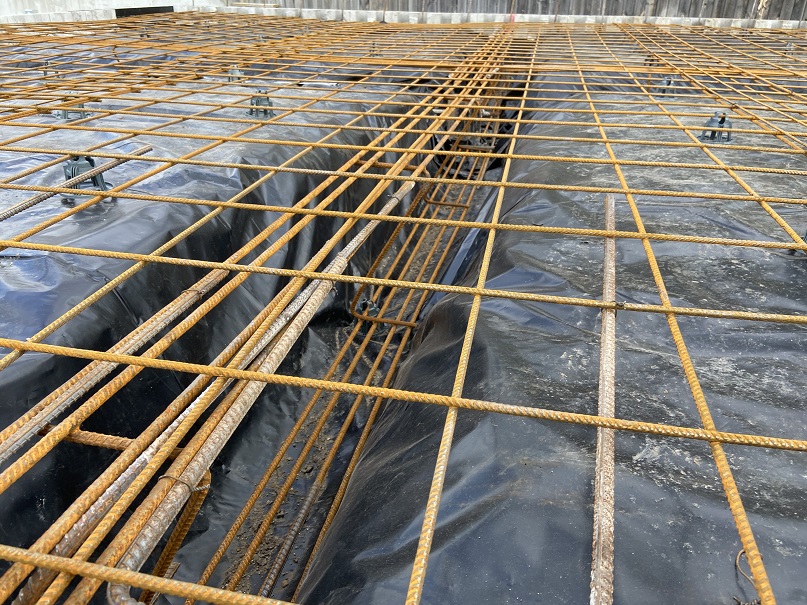
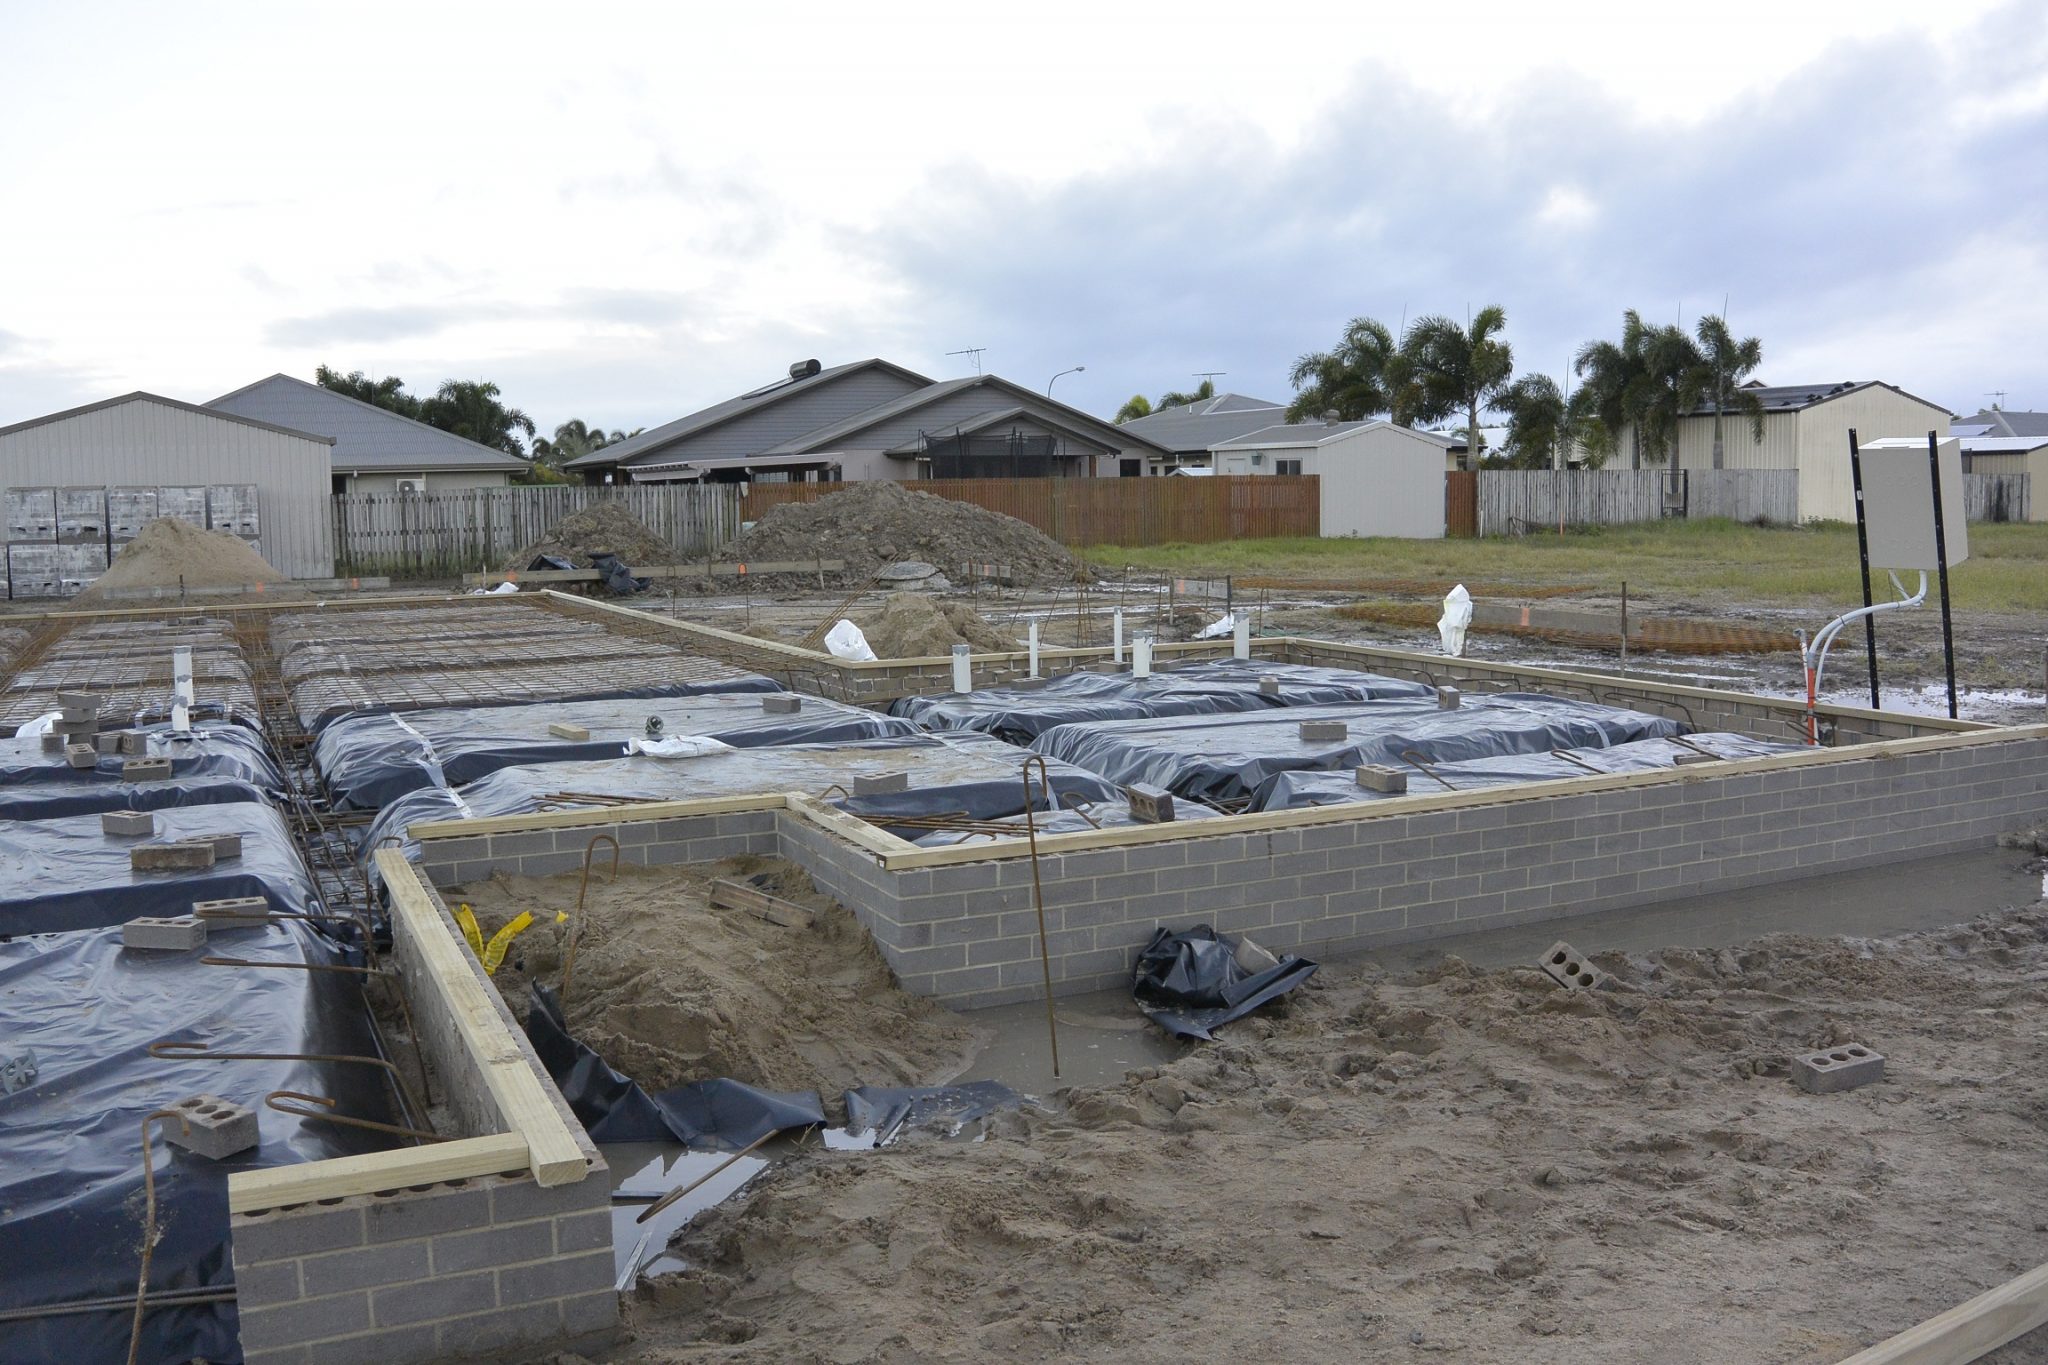
Strip footings visible in raft slab. Black plastic is polyethylene membrane. Plastic things holding up the steel are bar chairs. Mesh on top is steel reinforcement mesh.
These are the reasons your bathroom renovation project might need a structural engineer:
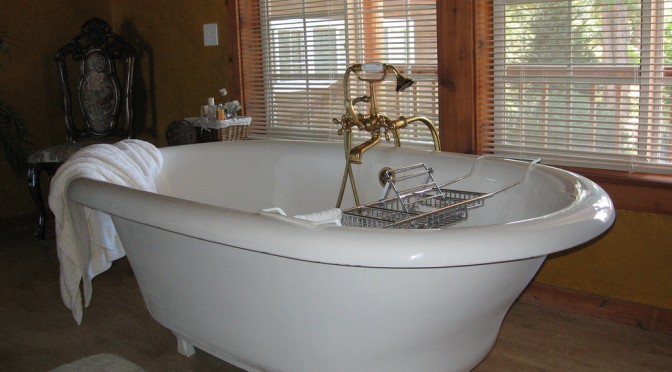
You don’t want your classic claw foot bath to fall through the floor. The weight of a classic claw foot baths sits on just 4 ‘feet’. Don’t overload your floor or floor joists. Get us to check the capacity of your bathroom’s floor or ask us to strengthen your bathroom floor.
You want to put your sink in a new location and you have to cut your concrete slab to lay pipes in a trench. Reinstating concrete after it has been cut should be done with galvanised steel dowels to tie the new concrete to the old concrete. We’ll specify the size and spacing of the dowels and let you know if you need slab reinforcement.
The tiles in your bathroom are drummy and you are worried about how to fix them. When tiles become loose in the bathroom, we’ll help you determine if there is slab movement of a problem with water seepage.
You want to make the bathroom larger and need to remove or relocate a wall. Load bearing walls can be demolished once the roof has been re-supported and any bracing loads have been transferred.
The window in your bathroom is too small. You’d like to install full height louvers instead. Louvers and new windows look great in bathrooms. If the opening doesn’t get any wider you might be ok otherwise we can help by specifying the lintel over the window and the number of jamb studs beside the window.
You’d like the tiles of your bathroom floor level with your timber floor. New or old floors can be set down so that the tiles in the bathroom are at the same level as the rest of the house. We specify the work needed to remove the trip hazard at your bathroom and toilet doors.
Call us to Get a Quote or ring for a chat. We’re here to help.
Cornell Engineers. We’re structural engineers for Bathrooms!
I’m Matt Cornell. I love structural engineering. When it comes to renovating, these are my 5 must-have features for any home renovation project.
High ceilings
When the air-conditioning isn’t on, the next best way to improve the ambiance of a room is to have beautiful high ceilings. High ceilings allow air-flow and dramatically improve the feel of a room.
If you are raising an existing house or adding a building extension, don’t feel that you have to match existing wall heights. Aim for a 2.7m wall height if you can. If you’re feeling really luxurious then you definitely must have 3 metre high ceilings.
High ceilings in a living room or bedroom drastically make a home more appealing and more valuable to me.
Built-in Ethernet cabling
Televisions and computers (and soon fridges) need high speed internet to make them really useful, and high speed internet is best and most securely served by traditional blue or yellow cables.
Wireless is fine for Ipods and tablets, but to get the most out of your leisure time, open your electronic gadgets up to the world of fast internet. The best time to run these cables during a renovation is before the wall cladding goes onto the walls. After that getting internet to your 3 televisions and 4 computers becomes a lot more difficult and expensive.
Connect every bedroom and every living area with Ethernet cables for the absolute best value. Run all of your cables back to a central location, install a data switch and a small rack next to your modem and experience the benefit of having a connected house.
Exposed Hardwood
There is nothing as beautiful and warming as a solid hardwood feature in a house. I love hardwood staircases and hardwood flooring. Use recycled timber for a more timeless aesthetic feel. Carpet and tiles look wonderful, but feature hardwood timber to add big value for me.
Street Appeal
Having a luxurious house hidden behind a dingy façade is a little old fashioned. A beautiful house starts with a front elevation that has a huge wow factor.
Big WOW means different things to different people, but for a building to have WOW factor it must have a commanding presence. It must have shapes and overhangs to shade the walls. It must have windows positioned to provide privacy to the internal spaces. It must have a link to heritage and character of the street and yet be unmistakable in its presence.
Great street appeal adds huge value for me.
Reverse cycle air-conditioning
When renovating in Queensland, adding air-conditioning is a “must have” because air-conditioners add big value to homes. Better still it must be reverse cycle air-conditioning.
Air-conditioning is affordable to everyone now that energy efficient air-conditioners are available. I prefer split systems over ducted systems because I am only in one room at a time and I’d prefer to only heat or cool that room.
In your next renovation throw out the old window wall air-conditioners and get a professional to install split systems into every living room and bedroom.
Conclusion
If you’re planning a home renovation or a new home, how many of these features will make it onto your features list? Speak to your building designer and Cornell Engineers about how to add real, timeless value to your next home renovation project.
A raft slab is a reinforced concrete slab on ground that is strengthened with integral concrete beams in both directions.
Usually, a raft slab is used as the foundation for new houses and extensions. Raft slabs in Australia are designed to comply with Australian standard AS2870.
At Cornell Engineers, we call the strengthening beams strip footings (because they run in parallel strips). The beams around the outside are called edge beams.
How Thick is a Raft Slab
The slab portion of a raft footing and slab is normally 100mm (4 inches) thick.
Sometimes the slab is made thicker, up to 150mm (6 inches) thick, to make it stronger or able to span further.
The strip footings vary in depth depending on the soil conditions on the site. A site classification by a soil tester tells us how reactive the clays are.
Then the stip footing design is done in accordance with AS2870.
What is the Minimum Thickness of a Raft Slab
In residential buildings, the minimum thickness of a raft slab is 85mm (3.35 inches) in waffle slab construction and 100mm (4 inches) in raft slab construction.
How is a Raft Slab Built
Here’s the process for building a raft slab for a house.
Step 1 – Set Out
A builder sets out the outer boundaries of the house using surveying equipment.
Smart builders use a surveyor to make sure the house is in the correct location and on the correct site!
The footings around the outside of the house are called edge beams. The edge beams are dug into the ground.
The width of the edge beams is normally 300mm unless soil conditions require the edge beams to be wider.
The depth of the edge beam depends on the reactivity of the soil.
Step 3 – Steel reinforcement for raft slabs
Steel reinforcement is placed into the edge beams.
The steel can’t be close to the ground or it will rust and fail – so concreters use plastic supports called ‘bar chairs’ to hold the steel away from the ground.
The amount of steel is specified by the structural engineer depending on the site reactivity and the depth of the edge beams.
If the soil where the edge beams are required, the builder sometimes digs the edge beams deeper so that the footing is dug into hard ground. The steel reinforcement is then suspended at the depth specified by the structural engineer.
Step 4 – Edge beams filled
The edge beams are filled with concrete up to ground level.
Steel starter bars are placed into the wet concrete at regular centres and are left sticking out of the footing to connect the slab to the edge beams.
The strip footings aren’t poured until the slab is poured.
The exact location of the starter bars isn’t very important, but their spacing is.
If you are an engineer, the diameter and spacing of the starter bars are a shear flow problem. There needs to be enough bars to make the slab and beams work as a single beam. The starter bars are not required if the edge beam and slab are poured at the same time.
Raft Slab Edge Beams Poured. Photo courtesy of Titan Homes Mackay.
Step 5 – Sand fill
Once the edge beam concrete has hardened, the concreters will place the sand that goes under the slab to make it the correct height. Sand or crusher dust or decomposed granite are all acceptable in my opinion.
The sand has to be compacted so that it is firm and hard because it has to support the wet concrete of the slab before it cures.
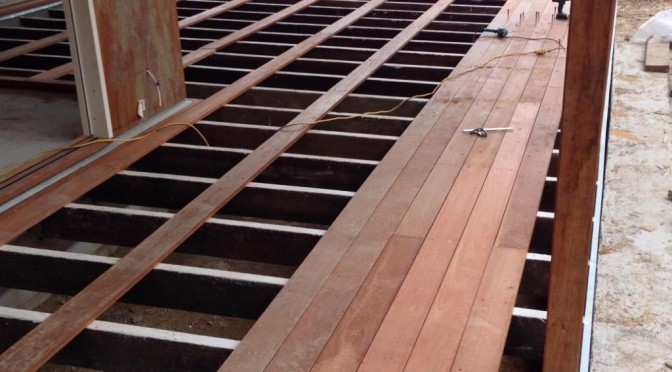
Raft slab being prepared by a builder. Photo courtesy of Titan Homes Mackay
Step 6 – Excavate strip footings
Once the sand is placed everywhere under the slab, the concreters remove the sand from where the strip footings run.
If the surface of the slab is high enough, the strip footings will be above the original ground level. Otherwise, the concreters have to dig through the sand and remove some of the original ground to get a deep enough strip footing.
Step 7 – Damp proof membrane
The concreters place a black plastic sheet into the strip footings and over all of the ground under the slab.
The edges of the sheets of black plastic have to be lapped and taped because the plastic stops the ground sucking moisture out of the wet concrete before it cures and also helps stop moisture rising out of the ground and through the concrete.
Step 8 – Slab reinforcement
The concreters place steel trench mesh reinforcement into the strip footings and sheets of slab reinforcement mesh everywhere in the slab.
The concreters use plastic bar chairs to make sure the reinforcement is not touching the plastic and is not sitting so high it is poking out the top of the slab.
The slab reinforcement is very important because it helps control the size of cracks in the surface of the raft slab. See this post on shrinkage cracks.
Raft slab strip footing and slab mesh. Photo courtesy of Titan Homes Mackay.
Around the outside of the raft slab – above the edge beams – the concreters use formwork or concrete blocks to make the sides of the slab.
If the ground is sloping, sometimes the concrete blocks are laid before the sand is placed – but that makes it very difficult to place and compact the sand properly.
Step 9 – Pouring the raft slab
The concreters pour concrete into all of the strip footings and the slab using concrete trucks and concrete pumps. We prefer they use boom pumps because they are less likely to knock the bar chairs over.
The concreters make the concrete surface smooth and level (called screeding) and then allow the concrete to dry (called curing).
If the concrete dries too quickly, the surface can crack – just like mud cracks when the surface dries when it is still wet underneath. The concreters use special chemicals called ‘curing compounds’ to make sure the concrete all cures at the same time.
Raft slab concrete has been poured. Photo courtesy of Titan Homes Mackay.
The Raft Slab is Finished
The concrete reaches its full design strength in less than 28 days (normally about 23 days) but the slab can be walked on and worked on well before that.
The formwork is normally removed the day after the concrete is poured.
Who Designs Raft Slabs
Raft slabs are designed by structural engineers experienced in residential construction.
There are lots of rules for working out the depth and spacing of strip footings in a raft slab so it is very important to get them right.
An experienced structural engineer can give you an accurate and cost-effective raft slab designed to suit your site.
How Can Cornell Engineers Help
Cornell Engineers has been designing raft footings and slabs since 2003.
Our footing and slab designs comply with AS2870-2011, the Australian residential footings and slabs code.
When we design raft slabs we ensure your slab is suitable for your site by designing your slab to comply with the soil conditions on your site as described in your soil test.
We save you money by making sure our raft slabs drawings are easy to understand and easy to build from.